Feature Enhancements in Version 18.1

Windows 10 Creators Update Now Supported
Encompass 18.1 can now be successfully installed and operated on machines using Microsoft's Windows 10 Creators Update (version 1703) operating system (64-bit version only).
CFUN-10270
Support for Biweekly Loans
Why we made this update: Support is being added for biweekly payment streams in escrow data and for disclosing biweekly information on the Loan Estimate and Closing Disclosure forms to support compliance with CFPB (Consumer Financial Protection Bureau) Know Before You Owe regulations for biweekly loans.
Encompass 18.1 includes the following updates to support correct aggregate analysis of biweekly loans. For a detailed overview of how these updates affect various tools and forms in Encompass, refer to the Biweekly Aggregate Escrow Updates in Encompass 18.1 guide on the Encompass help site.
Updates have been made to the G. Initial Escrow Payments at Closing section on the Loan Estimate Page 2 and Closing Disclosure Page 2 to support the disclosure of initial escrow amounts for biweekly loans. When the Biweekly checkbox (field ID 423) has been selected for a loan file, the labels in these sections are adjusted to display biweekly payment frequencies instead of monthly payments and are adjusted to display bwk (for biweek) payments instead of mth (for month). The biweekly analysis has also been modified to show the correct amounts for biweekly loans.
Loan Estimate Page 2

Closing Disclosure Page 2

CBIZ-12816
The following updates have been made to support escrow and payment calculations for biweekly loans.
Escrow cushions:
-
As many as four cushion payments are now allowed for biweekly loans. These reflect biweekly amounts.
-
Biweekly payment amounts are now being used to calculate single-line and aggregate biweekly loan cushions.
For escrowed line item in the 1000 section of the 2015 Itemization input form:
-
Biweekly payment fields now display instead of monthly fields. For example, field ID HUD53 is used instead of field ID 230 for the calculated monthly Homeowner's Insurance amount on line 1002.
-
Biweekly payment fields now display instead of monthly fields in the Fee Details windows that can be accessed from the 2015 Itemization form. For example, field ID HUD53 is used instead of field ID 230 for the calculated monthly Homeowner's Insurance amount on the fee Details window for line 1002.
The new biweekly calculations have no impact on the 1008 input form or the Details of Transaction section on forms such as the 1003 Page 3.
The calculated biweekly escrow payment amounts cannot be directly edited on the 2015 Itemization or Bi-weekly Loan Payment Summary input forms. Enter the monthly proposed housing expenses on the 1003 Page 2, and then set up the biweekly escrow payments on the Initial Escrow Account Setup window.
CBIZ-9795
Due to the calculations of single line analysis for biweekly escrows, certain scenarios can result in the calculation of a positive aggregate escrow adjustment. An alert (Positive Aggregate Escrow Adjustment) has been added to Encompass to alert the user if this scenario occurs on the loan level. While the positive aggregate adjustment calculation is technically correct, an investor or regulator might not approve purchasing a loan with a positive aggregate adjustment. The new alert informs the Encompass user that a positive adjustment exists and suggests two methods for resolving the issue:
-
Move a portion of the escrow items to prepaid (section 900 on the 2015 Itemization).
-
Click the Lock icon for the Aggregate Adjustment amount (field ID 558) to accept and retain the positive number.
If the fields is locked, it will not recalculate if additional changes are made to the escrow analysis.
The alert triggers when the Aggregate Adjustment amount (field ID 558) is greater than 0. A link on the alert opens the 2015 Itemization input form at Aggregate Escrow field on line 1011. The alert clears when the Aggregate Adjustment amount (field ID 558) is locked or when the field recalculates to be equal to or less than 0.
CBIZ-13609
Construction Loans
Encompass has expanded its ATR/QM analysis to include ratios for construction-to-permanent loans based on the length of the construction term for purposes of 1026.43(e)(2)(iv)(A) and determining ATR/QM Qualified Mortgage status. Updates have been made to the calculations Encompass uses for the maximum interest rate that may apply during the first five years for construction-to-permanent loans. The following table describes the ATR/QM reviews used for construction loans based on the Purpose of Loan and Construction Term.
| Purpose of Loan | Construction Term | ATR/QM Handling |
|---|---|---|
| Construction | 12 months or less | Exempt |
| Construction | Greater than 12 months | General ATR/QM review |
| Construction-Perm | 12 months or less | General ATR/QM review, construction term excluded |
| Construction-Perm | Greater than 12 months | General ATR/QM review, construction term included |
CBIZ-8147
Encompass Forms and Tools
Why we made this update: The Loan Funds Usage section on the Request for SFH Loan Guarantee/Reservation of Funds tab on the USDA Management input form has been updated based on recent commentary from the United States Department of Agriculture (USDA) regarding how the financed and non-financed portions of the Guarantee Fee are included in various calculations.
To comply with the details described in the USDA commentary, changes have been made to the following fields in the Loan Funds Usage section on the Request for SFH Loan Guarantee/Reservation of Funds tab on the USDA Management input form. These changes are also reflected in the calculation used for the Total Request amount (field ID USDA.X26) calculations at the bottom of the Loan funds Usage section:
-
Financed Loan Closing Costs - The Amount field ID has been assigned a new field ID (USDA.X217). The field is populated with the Total Financed Charges (field ID NEWHUD.X1585) from the 1400 section on the 2015 Itemization minus the PMI, MIP, Financed amount (field ID 1045) from the 1003 Page 3.
-
Guarantee Fee - Field ID 1045 is now being used instead of field ID 1826. Field 1045 includes only the portion of the Guarantee Fee that is financed.
When migrating to Encompass 18.1, the Financed Loan Closing Costs is populated using the new calculation. The Total Request amount is also recalculated.
CBIZ-8564
Why we made this update: New fields have been added to enable entry of data used to populate the Water Purification Equipment Rider form.
The following new fields have been added to the Property Information section on the Basic Info tab on the FHA Management form to enable entry of data related to the service contract for water purification equipment information when applicable for an FHA loan.
-
Water Purification Maintenance Organization (field ID 4249)
-
Water Purification Local Health Agent (field ID 4250)
-
Water Purification Other Payees (field ID 4251)
This information is populated to the Water Purification Equipment Rider form.
CBIZ-8980
To ensure there are no issues with various product and pricing interfaces, the decimal place format for the following five fields on the Purchase Advice Form have been increased to six decimal places.
This enhancement was implemented as part of the Ellie Mae Idea Center initiative.
-
Actual Sell Side SRP (field ID 3426)
-
Net Sell Price (field ID 2207)
-
Sell Side SRP (field ID 2209)
-
Diff Sell Price (field ID 3423)
-
Diff Sell Side SRP (field ID 3427)
SEC-12033
A new read-only Loan File Sequence Number (field ID LOANFILESEQUENCENUMBER) has been added to Encompass. The Loan File Sequence Number is created the first time a loan file is saved. Numbering begins with 1 and increases by a value of 1 each time the file is saved. The number is recorded in the loan summary table, and the field can be added to the Encompass Reporting Database for reporting purposes.
CBIZ-13569, NICE-4763
The following forms have been consolidated from multi-page forms into single-page forms in the Encompass Print window. In addition, the single-page version of the form has been migrated to the Encompass Docs Solution while the multi-page versions have been archived.
-
IRS4506 – Copy Request (Page 1, Page 2) (Name printed on form: Request for Copy of Tax Return)
-
IRS4056 – Copy Request (Classic) (Page 1, Page 2) (Name printed on form: Request for Copy of Tax Return)
-
IRS4506T – Trans Request (Page 1, Page 2) (Name printed on form: Request for Transcript of Tax Return)
-
IRS4506T – Trans Request (Classic) (Page 1, Page 2) (Name printed on form: Request for Transcript of Tax Return)
The content of these forms have not been changed. This is simply a change in how the forms are listed in the Print window. For example, when printing the Request for Copy of Tax Return form in earlier versions of Encompass, you would see IRS4506 – Copy Request Page 1 and IRS4506 – Copy Request Page 2 listed on the Standard Forms tab in the Print window. Starting in Encompass 18.1, this form is listed only once as IRS4506 – Copy Request and it includes the two pages of the form. The other three forms listed above will now be presented in the Print window in a similar fashion.

In order to make the new single page version of this form available in your Encompass system(s), the administrator or other authorized user must use the Documents tool in Encompass Settings to add the form as a new form. For instructions to add a new form, refer to the Documents topic in the Encompass online help.
In addition to this update to these forms in the Print window, there is also an impact on these forms when they are being sent electronically to a borrower or another recipient and when they are to be included in a eDisclosure package. Going forward, in order for the proper eSigning points to be applied to these forms when being sent electronically or as part of an eDisclosure package so that they can be eSigned by the recipient, you must indicate who the form is intended for by selecting an option from the Tax Form is for dropdown list on the applicable input form:
- Field ID IR0101 on the Request for Transcript of Tax input form
- Field ID IRS4506.X1 on the Request for Transcript of Tax (Classic) input form
- Field ID AR0101 on the Request for Copy of Tax Return input form
- Field ID IRS4506.X1 on the Request for Copy of Tax Return (Classic) input form
Visit the Encompass Docs Solution Help site for more information on forms, this migration, and the Encompass Docs Solution FAQs.
NDE-7963
The Itemized Fee Worksheet (Page 1 and Page 2) form (Name printed on form: Itemized Fee Worksheet) has been consolidated from a multi-page form into a single-page form in the Encompass Print window. In addition, the single-page version of the form has been migrated to the Encompass Docs Solution while the multi-page versions have been archived.
The content of this form has not been changed. This is simply a change in how the form is listed in the Print window. When printing the Itemized Fee Worksheet in earlier versions of Encompass, you would see Itemized Fee Worksheet Page 1 and Itemized Fee Worksheet Page 2 listed on the Standard Forms tab in the Print window. You would then need to manually add both of these pages to the Selected Forms list in order to print the entire form. Starting in Encompass 18.1, this form is listed only once as Itemized Fee Worksheet and it includes the two pages of the form.
Please note that one issue may occur for split fees on this new version of the form. On the printed form there are one or more codes provided to indicate who is paying the fee and if it will affect the APR or not. The code A indicates APR Affected by Cost. For a fee that is being partially paid by the borrower and partially paid by another party (e.g., the Lender), the borrower’s portion of the fee should be designated with the A code on the form. However, the A code is not displaying as expected. This issue is scheduled to be fixed in an upcoming Encompass release.

In order to make the new single page version of this form available in your Encompass system(s), the administrator or other authorized user must use the Documents tool in Encompass Settings to add the form as a new form. For instructions to add a new form, refer to the Documents topic in the Encompass online help.
Visit the Encompass Docs Solution Help site for more information on forms, this migration, and the Encompass Docs Solution FAQs.
NDE-9698
The following printed output forms have been migrated to the Encompass Docs Solution. The Encompass Docs Solution team started a project in 2015 where they began "migrating" Encompass forms from their current location in Encompass into the Encompass Docs Solution. The purpose of this project is twofold. First, having these documents generated from the Encompass Docs Solution will provide us the ability to ensure ALL of our documents are kept current in a timely manner. Second, the migration will bring consistency to our document library and allow us to leverage additional form level flexibility that the Encompass Docs Solution enjoys today.
Visit the Encompass Docs Solution Help site for more information on forms, this migration, and the Encompass Docs Solution FAQs.
Note that there were no content changes to any of these forms (except as noted below) and the existing form is current and up to date.
- Amortization Schedule, Complete
- The column order has changed slightly. The Year column has been removed. There is now an Ending Balance column that prints on the form. There is a Resulting LTV column that prints on the far right side of the form for FHA transactions as well as Conventional one-unit primary residence loans. In addition, when the signature type is set to eSignable the borrower signatures will now print on the form. At the end of the form there is now language advising that the Amortization Schedule is based on the existing terms of the loan only.
-
Disclosure Tracking Snapshots (2015 and 2010 versions)
-
Document List
-
Funding Balancing Worksheet
-
Payment History
-
Request for Verification of Deposit (VOD)
-
Request for Verification of Employment (VOE)
-
Request for Verification of Loan (VOL)
-
Request for Verification of Rent (VOR)
-
Tasks List
In order to make the new single page version of this form available in your Encompass system(s), the administrator or other authorized user must use the Documents tool in Encompass Settings to add the form as a new form. For instructions to add a new form, refer to the Documents topic in the Encompass online help.
NDE-9698, NDE-9507
FNMA File Imports
The following updates have been made to support the importing of data from FNMA 3.2 loan files:
-
The Est Closing Date (field ID 763) is now being imported into Encompass from FNMA 3.2 files.
-
A Lock icon has been added to the Other proposed monthly housing expenses (field ID 234) that displays on Input forms such as the 1003 Page 2 and the 2015 Itemization. This amount was imported into Encompass from FNMA 3.2 files in previous versions of Encompass and will continue to be imported, but the Lock icon will ensure that the value will not be recalculated after being imported unless an Encompass user clicks the Lock icon and triggers a recalculation.
CBIZ-13276
Encompass Settings
Starting in Encompass 18.1, new alert messages will be provided as clients reach or exceed certain enabled-user license limits. Typically these messages will be provided to administrators who are managing new and existing users in their Encompass system.
When an administrator navigates to Encompass > Settings > Company/User Setup > Organization/Users and attempts to add a new user or enable an existing user, the following messages will be triggered in these scenarios:
Enabled User Count is Near License Limit
When an administrator is enabling an existing user (or creating a new user) and they are nearing their user license limit, they will receive a warning message similar to this. After acknowledging the message by clicking OK, they will be permitted to enable or create the user.

User License Limit is Met
When an administrator is enabling an existing user (or creating a new user) that results in them reaching their user license limit, they will receive a warning message similar to this. After acknowledging the message by clicking OK, they will be permitted to enable or create the user.

User License Limit is Exceeded
When an administrator is enabling an existing user (or creating a new user) that results in them exceeding their user license limit, they will receive a message similar to this. After acknowledging the message by clicking OK, they will not be permitted to enable or create the user.

User License Limit Has Been Exceeded
In previous versions of Encompass, clients were permitted to exceed their user license limit by a small percentage. For those clients who have exceeded this limit, the administrator (i.e., the user who logs into Encompass using the admin user ID and/or any user assigned with the Administrator or Super Administrator persona) will receive a message similar to this when they are logging into Encompass 18.1 (and later):

NICE-4920
In the HMDA Profiles setting (Encompass > Settings > Loan Setup > HMDA Profiles), the fields for Respondent Contact Information and Parent Mailing Address in the Respondent Information section are now mandatory. These fields are marked with a red asterisk (*) and must be completed before a HMDA profile can be saved.
As a best practice, be sure to review the HMDA Profile and provide all mandatory information before generating a HMDA report,
NICE-4940
A new API User checkbox is now provided on the User Details screen when administrators are creating a new user. The purpose of the API User checkbox is to give Encompass administrators the means to grant a Supported Encompass Consulting Partner access to their company's Encompass instance via Encompass Developer Connect APIs. This checkbox is intended for use with Supported Encompass Consulting Partners only and should not be used for users within your organization. Note that once the consulting Partner and the Encompass administrator complete the required process (described below) they will be recognized as a Supported Encompass Consulting Partner who can then access the company's Encompass instance via the APIs you have stored in Encompass Developer Connect. These users will be restricted from logging into the company's live Production system via a client machine like a typical user in the organization would.
In order for a consulting Partner you are working with to use the APIs you have stored in Encompass Developer Connect, they must first request an API Key from Ellie Mae by sending an email to Ellie Mae at this address: EMPro_APIkey@elliemae.com. Once they receive this API Key (which consists of a client ID and client secret) they can provide it to you. At that point, you must create a new user profile for the consulting Partner by performing the following steps.
To Create the New User Profile for a Consulting Partner:
-
On the menu bar, click Encompass, and then click Settings.
-
On the left panel, click Company/User Setup, and then click Organization/Users.
-
In the upper panel, click to select an organization folder to which to add the user. You may need to expand the hierarchy to locate the folder.
-
In the lower panel, click the New icon.
- On the Organization/Users screen, in the upper panel, click to select an organization folder to which to add the user. You may need to expand the hierarchy to locate the folder.
- In the lower panel [Enabled Users], click the New icon.
- On the User Details screen, in the left panel, type a User ID.
- Select the API User checkbox.
- Enter the consulting Partner's OAuth Client ID. This is the client ID that has been provided to the Partner by Ellie Mae. Note that your company's assigned client ID cannot be used here.
- Follow the remaining steps provided in the Add a New User help topic as applicable to finish creating this user profile. Note that only required fields (denoted with red asterisk) need to be provided in order to save this new user profile.
- You are required to assign a persona to this user profile. You can select any persona for assignment. Since the Partner will be restricted from logging into Encompass, none of the access rights defined in the persona will come into play.
Please note that new users indicated as an "API User" as described here do count against your company's enabled user license limits.
NICE-5105
To clearly indicate to system administrators that the TPO Connect Docs tab on the Company Details settings screen is for both Encompass TPO Connect and TPO WebCenter, the TPO Connect Docs tab label and all references to “TPO Connect Docs” on the tab have been changed to TPO Docs.
This is a label change only. The existing functionality will remain the same.

To Access the Company Details Basic Info Tab:
- On the menu bar, click Encompass, and then click Settings.
- In the left panel, click External Company Setup, and then click Company Details.
- In the Company/Branches panel, click Third Party Originator.
- Click the New icon to create a new TPO or select an existing TPO, and then click the Edit icon.
SEC-11564
To clearly indicate to system administrators that the TPO WebCenter Docs settings under External Company Setup is for both Encompass TPO Connect and TPO WebCenter, the TPO WebCenter Docs settings label and all references to “TPO WebCenter Docs” on the settings screen have been changed to TPO Docs or TPO site.
This is a label change only. The existing functionality will remain the same.

To Access the TPO Docs Setting:
- On the menu bar, click Encompass, and then click Settings.
- In the left panel, click External Company Setup, and then click TPO Docs.
SEC-11750
To enable system administrators to customize milestone statuses in Encompass for Encompass TPO Connect users, a new TPO Connect Status field has been added to the Milestones setting screen that allows a custom Encompass TPO Connect status to be assigned to a milestone.
If the TPO Connect Status field is populated for a milestone, that TPO Connect Status value will be displayed in the Encompass TPO Connect loan Pipeline's Status column when the matching milestone is current.
If the TPO Connect Status field is not populated, the Encompass TPO Connect loan Pipeline's Status column will be blank for that milestone.
This setting is only displayed if the site for the TPO has been provisioned.

In addition, a TPO Connect Status column has been added to the Milestones screen. Every milestone with an associated TPO Connect Status value will have those values displayed in the TPO Connect Status column.

To Access the Milestones Setting:
- On the menu bar, click Encompass, and then click Settings.
- In the left panel, click Company/Users Setup, and then click Milestones.
SEC-12036
Please note that the following update, while visible in Encompass Settings, is not intended for use at this time. This feature will be fully functional for use with Encompass TPO Connect in a future release. Please do not use this option at this time.
A new option has been added to the Conditions setting to enable Encompass TPO Connect users to upload loan attachments to conditions quicker, without having to create a document container first. With this option, each time an underwriting condition is created in this setting, the administrator can automatically link a document with the condition.
- Document with same name as condition - With this option selected, a document with the same name as the condition name is linked with the condition.
- Default Document - With this option selected, the administrator can click the Select Document button and then select the document to link with the condition.

NICE-4336
To make it easier for users to select the correct Investor Template, two field labels have been changed to provide more clarity.
- Investor Name field has been changed to Template Name
- Name field has been changed to Investor

In addition, on the Loan Trades and MBS Pools Details tab, the Name field on in the Addresses section has been changed to Investor.

To Access the Loan Pricing Decimal Places Setting:
- On the menu bar, click Encompass, and then click Settings.
- In the left panel, click Secondary Setup, and then click Investor Templates.
SEC-11966
To enable system administrators to configure the decimal places for the Sell Side SRP Paid Out field (field ID 2276) beyond the default 3 decimal places, the field has been added to the Loan Pricing Decimal Places setting under Secondary Setup.
This enhancement was implemented as part of the Ellie Mae Idea Center initiative.
To Access the Loan Pricing Decimal Places Setting:
- On the menu bar, click Encompass, and then click Settings.
- In the left panel, click Secondary Setup, and then click Loan Pricing Decimal Places.
SEC-12031
Trade Management
To provide correspondent customers with the ability to remove loans from a Bulk correspondent trade and automatically assign a canceled date or withdrawn date (depending on the loan’s status), the following process will now occur.
- Before the new automated process can begin, the following criteria must be met:
- Correspondent trade must have a Delivery Type of “Bulk”.
- Loans must be selected before clicking the Delete (remove) icon on the Loans tab.
- Loans cannot be flagged as “Voided”.
- The following validations will be performed before the loan is removed:
- Any loans from the bulk trade that have been submitted (Submitted for Review (field ID 4119) is populated) will be removed as a withdrawn loan.
- Any loans from the bulk trade that have not been submitted will be removed as a canceled loan.
- After the trade update is done for a canceled loan, the Cancelled Date (field ID 4207) on the Correspondent Loan Status form will be updated with the date the loan was removed from the trade.
- The Lock and Request Status will be “Lock Cancelled” after the trade update.
- After the trade update is done for a withdrawn loan, the Withdrawn Date (field ID 4120) on the Correspondent Loan status form will be updated with the date the loan was removed from the trade.
- The Lock and Request Status will be “Lock Cancelled” after the trade update.
SEC-12017
For users that trade options, a new Option Premium field has been added to the Security Trades Details tab to capture the cost.

In addition, this new field has been added to Customized Columns on the Security Trades List page and to the Security Trades Reports.
SEC-12014
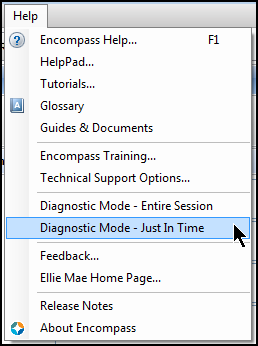
New Encompass Diagnostic Tool
A new Diagnostic Mode – Just in Time option is now available for admin users (and other authorized users provided with the required access rights via their persona) in the Encompass Help menu. In addition, the Diagnostic Mode option available in previous versions of Encompass has been renamed to Diagnostic Mode – Entire Session.
The Diagnostic Mode – Just in Time (JIT) option can be used to perform application logging in real time. Clients can use this to diagnose issues, investigate how features are working, and monitor activities in Encompass. Users can create a JIT log file with pertinent application data and then send it to Ellie Mae’s Technical Support team so they can analyze it and help diagnose issues or provide guidance on Encompass usage. Once you click the Diagnostic Mode – Just In Time option, the following actions are provided:
- Start Logging – Click this button to start the logging process. (Once clicked, this button will change to Stop Logging. Click this button to stop the logging process.)
- Open Encompass Log - Click this button to open the JIT log file.
- Open File Location – Click this file to open the directory where the JIT log file is located.
- Add Note – Click this button to enter a note that will be added to the log file. This entry is recorded in real-time to assist you in diagnosing issues. For example, you could click Add Note and then enter a note such as Save Loan File after changing address right before or after you perform the task.

It is very important to note the JIT log file is transferred manually to the Technical Support team using various methods such as Bomgar, WebEx virtual meeting, or an MIS services/diagnostics site. These are the same methods that were used with the data generated in Diagnostic Mode in previous versions of Encompass and will continue to be used with the Diagnostic Mode – Just In Time option. These log files may contain sensitive Personally Identifiable Information (PII). Therefore, it is very important that you use these current transfer methods to send the log file to Technical Support. Do not send the log file using email or any other similar methods.
If your company was granted access (via a custom plugin) to the Encompass JIT Logger prior to the Encompass 18.1 major release, it is important that you no longer load that JIT Logger custom plugin. Running the plugin version at the same time as this new Diagnostic Mode – Just In Time version provided from the Encompass Help menu will cause issues with the tool.
CFUN-5356
Encompass Software Development Kit (SDK)
In Encompass 17.4, the relevant code in the Encompass SDK was updated to help avoid a race condition between Loan Open and Loan Lock.
Prior to this update, Encompass performed these steps when opening/editing a loan (2 API calls):
- Open the loan
- Lock
- Make edits / changes
- Commit
- Unlock
After this update, Encompass can perform these steps when opening/editing a loan (1 API call):
- Open the loan with lock
- Make edits / changes
- Commit
- Unlock
This update enabled Encompass SDK users to use this new singe API call to help avoid race conditions. Now in Encompass 18.1, additional logic has been introduced to help prevent users who are still using the older method (2 API calls) to perform Loan Open and Loan Lock operations from inadvertently overwriting a more recent copy of a loan file. When a user attempts to save a loan file, Encompass now compares the loan file sequence number of the file (which is captured in a new read-only field (field ID LOANFILESEQUENCENUMBER)) from the save request with the loan file sequence number on the Encompass Server file system. If the loan file sequence number on the server does not match the loan file sequence number in the save request the file is not updated and the following error message is displayed:
The loan can not be saved as a more recent version may already be available on the server.
When a user attempts to save the file in Encompass, this error message is displayed to the user. If the save request comes from the Encompass SDK, this same exception message is captured in the log.
Note that this new loan file sequence number comparison logic is being used in addition to the existing logic where Encompass verified the loan's Last Modified date before saving the file. Once the Last Modified date verification is complete, the system proceeds to compare the loan file sequence numbers. In the event that these numbers do not match, the error message is displayed and/or captured in the log as described above.
NICE-4902